Klik hier als je zoekt naar de vHub handleiding.
Een veel voorkomend probleem is het (opnieuw) verbinden van zappi met het internet via Wifi. Dit is een wat ingewikkelder proces met een aantal stappen, waarbij men snel iets over het hoofd ziet of foutief invoert.
Stap 0: Reset Wifi Configuratie
Voer deze stap alleen uit wanneer u al eerder heeft geprobeerd om een internetverbinding te maken, of u al internetverbinding had, maar deze is weggevallen. Druk op de 'Menu'-knop --> ga naar 'Overige Instellingen' --> 'Geavanceerd', het wachtwoord is meestal 0 0 0 0 --> 'Systeem' --> RESET Wifi Config --> druk op de Plus-knop om te bevestigen.
Stap 1: Controleer of er vinkjes staan bij 'Bevestig Master' en 'Set vHub'.
Druk op de 'Menu'-knop --> ga naar 'Overige Instellingen' --> 'Geavanceerd', het wachtwoord is meestal 0 0 0 0 --> 'Gelinkte apparaten'. In dit scherm zie je over vinkjes achter 'Bevestig Master' en 'Set vHub' staan. Staan deze er niet kun je deze opties selecteren en twee keer op de Plus-knop drukken om ze te activeren.
Stap 2: Access Point aanzetten.
Om internetverbinding te kunnen maken moeten WiFi en het Access Point van de zappi ingeschakeld zijn.
Ga naar 'Overige instellingen' --> 'Internet' --> 'WiFi' --> 'WiFi Instellingen' --> selecteer 'Access Point' / 'WIFI' en druk op de Plus-knop om deze op 'ON' te zetten.
Stap 3: Smartphone / PC verbinden met het Access Point.
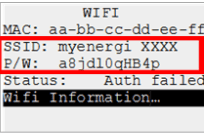
Om de WiFi te activeren op de zappi moet men verbinding maken met het Access Point via een smartphone of computer, om dit te doen ga je naar de WiFi-instellingen van het apparaat dat je hiervoor wil gebruiken. Kies het netwerk met dezelfde naam als in het scherm WiFi-instellingen op de zappi wordt weergegeven (SSID) en vul het wachtwoord in zoals weergegeven bij P/W (let op, hoofdlettergevoelig!).
Stap 4: WiFi-setup
Na het invullen van het wachtwoord, kom je als het goed is vanzelf op de pagina myenergi WiFi Setup. Indien deze pagina niet vanzelf verschijnt, kies je in de webbrowser het volgende adres: http://192.168.4.1.
Op deze pagina wordt gevraagd om een wachtwoord aan te maken (minimaal 8 tekens, combinatie van kleine letters, hoofdletters en cijfers. Verzin hier een wachtwoord, voor het gemak bijvoorbeeld Winter1234.
De webpagina gaat nu opnieuw laden, eenmaal verbonden krijg je het volgende scherm te zien:
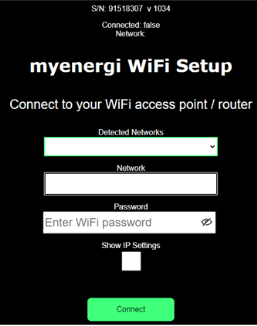
Selecteer bij 'Detected Networks' het netwerk waarmee de zappi verbonden moet worden en vul het wachtwoord van het geselecteerde netwerk in.
Stap 5: Controle
Om te controleren of de verbinding juist tot stand is gebracht, kijk je bij het Menu WiFi-instellingen op de zappi of er bij Status 'Connected' staat. Staat dit hier niet, dan is er iets mis gegaan en moet er opnieuw geprobeerd worden om verbinding te maken vanaf Stap 1.
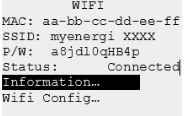
Bij 'Status' moet 'Connected' staan
ENGELSE VERTALING
Step 0: Reset WiFi Configuration
Only perform this step if you have previously attempted to establish an internet connection or if your internet connection has dropped. Press the 'Menu' button --> go to 'Other Settings' --> 'Advanced', the password is usually 0 0 0 0 --> 'System' --> RESET WiFi Config --> press the Plus button to confirm.
Step 1: Check 'Confirm Master' and 'Set vHub' Options
Press the 'Menu' button --> go to 'Other Settings' --> 'Advanced', the password is usually 0 0 0 0 --> 'Linked Devices'. In this screen, check if there are ticks next to 'Confirm Master' and 'Set vHub'. If they are not there, you can select these options and press the Plus button twice to activate them.
Step 2: Turn on Access Point
To establish an internet connection, WiFi and the zappi's Access Point must be enabled.
Go to 'Other Settings' --> 'Internet' --> 'WiFi' --> 'WiFi Settings' --> select 'Access Point' / 'WIFI' and press the Plus button to set it to 'ON'.
Step 3: Connect Smartphone/PC to the Access Point
To activate WiFi on the zappi, you need to connect to the Access Point using a smartphone or computer. To do this, go to the WiFi settings of the device you want to use. Choose the network with the same name as displayed on the zappi's WiFi settings screen (SSID) and enter the password as shown in the P/W section (note that it is case-sensitive!).
Example Step 4: WiFi Setup
After entering the password, you should automatically be redirected to the myenergi WiFi Setup page. If this page doesn't appear automatically, enter the following address in your web browser: http://192.168.4.1.
On this page, you'll be asked to create a password (minimum 8 characters, combination of lowercase letters, uppercase letters, and numbers). Come up with a password, for example, Winter1234.
The web page will now reload, and once connected, you'll see the following screen:
Select the network you want to connect the zappi to under 'Detected Networks' and enter the password for the selected network.
Step 5: Verification
To verify if the connection has been established correctly, check the WiFi settings in the zappi's Menu to see if it says 'Connected' under Status. If it doesn't, something went wrong, and you should retry the connection from Step 1.
Under 'Status', it should say 'Connected'.